How to install video surveillance yourself. Part 1: format selection, editing

Home ➤ Knowledge base ➤ 21.06.2024

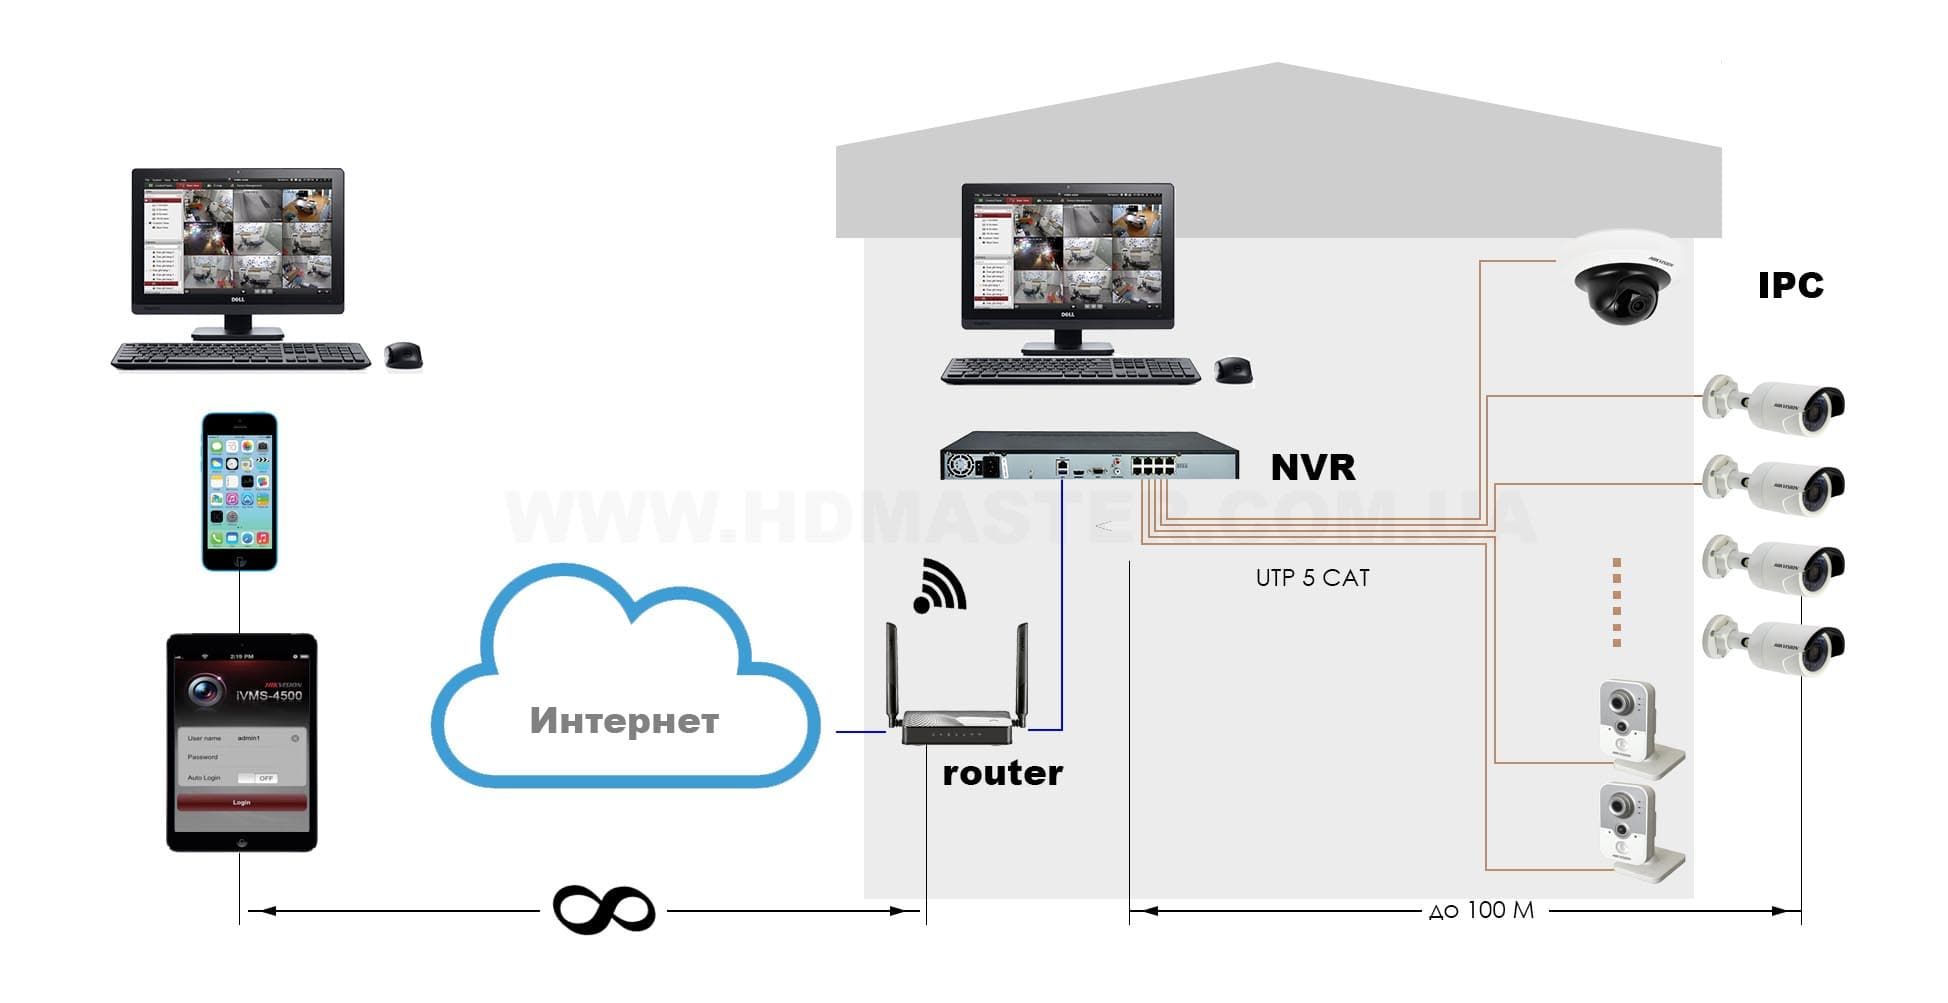
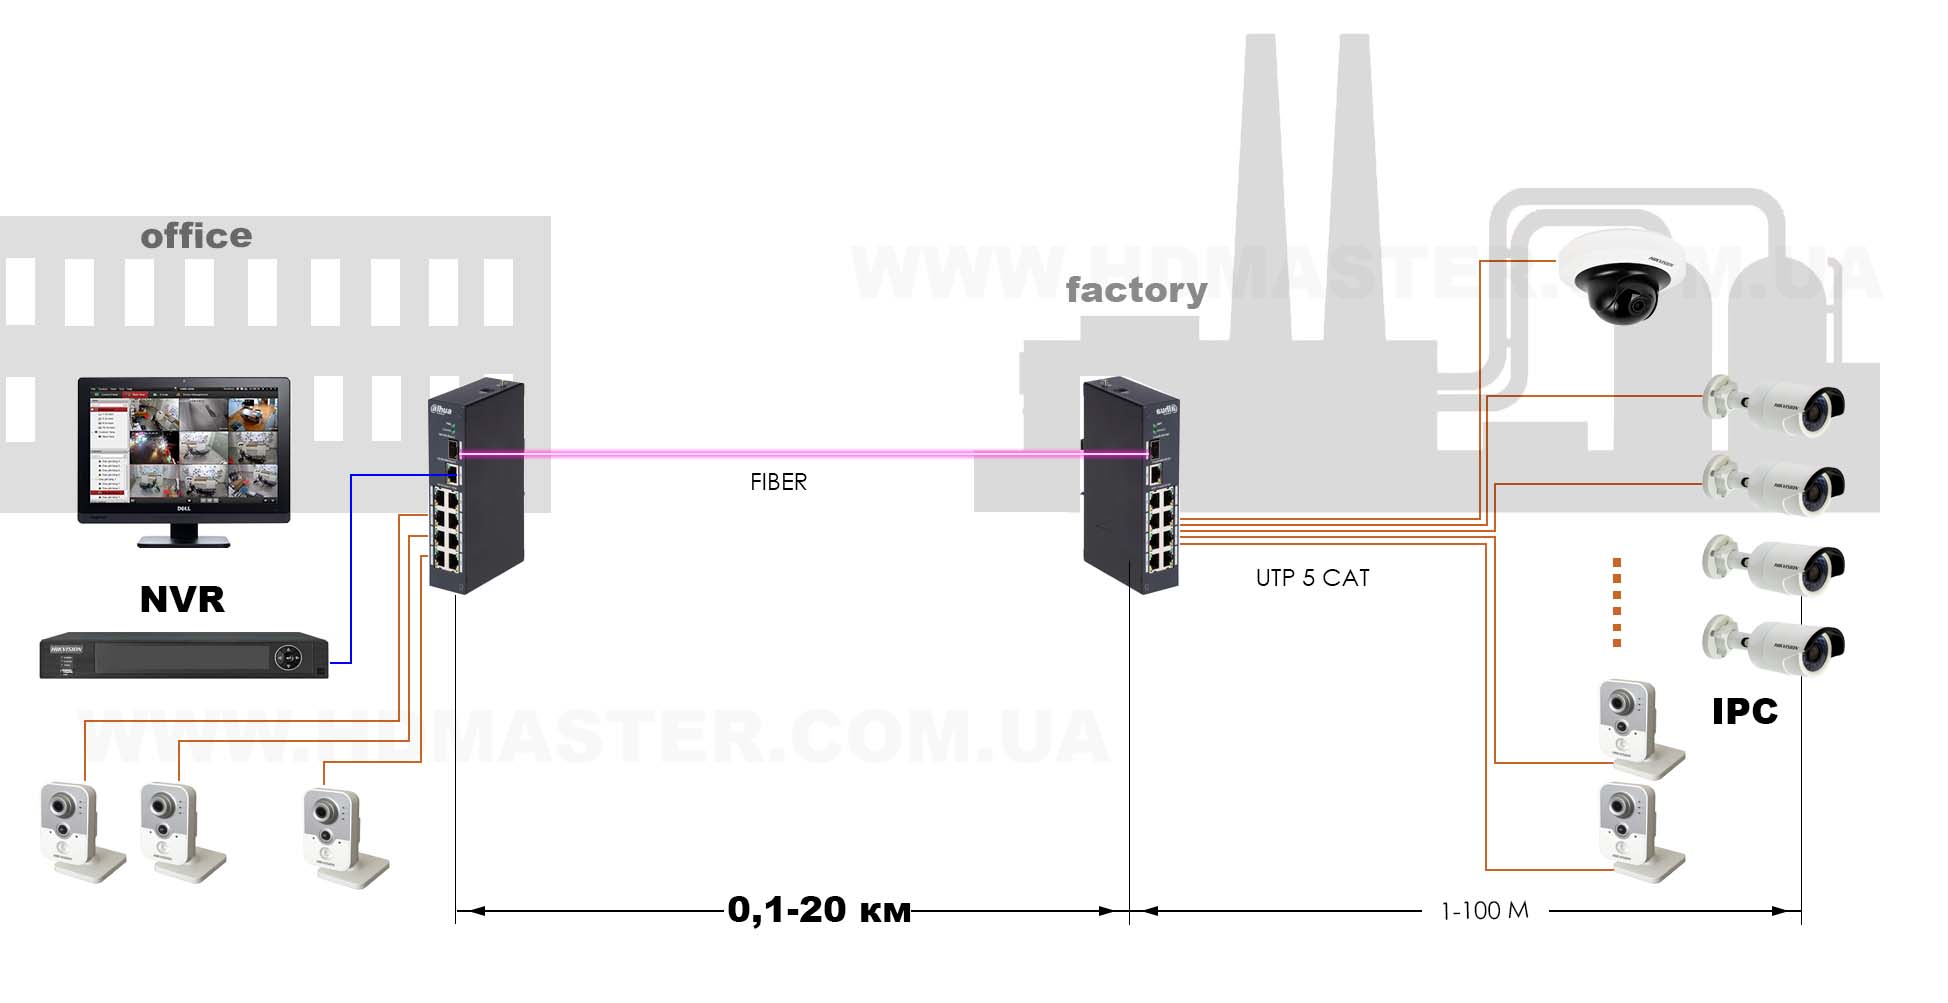
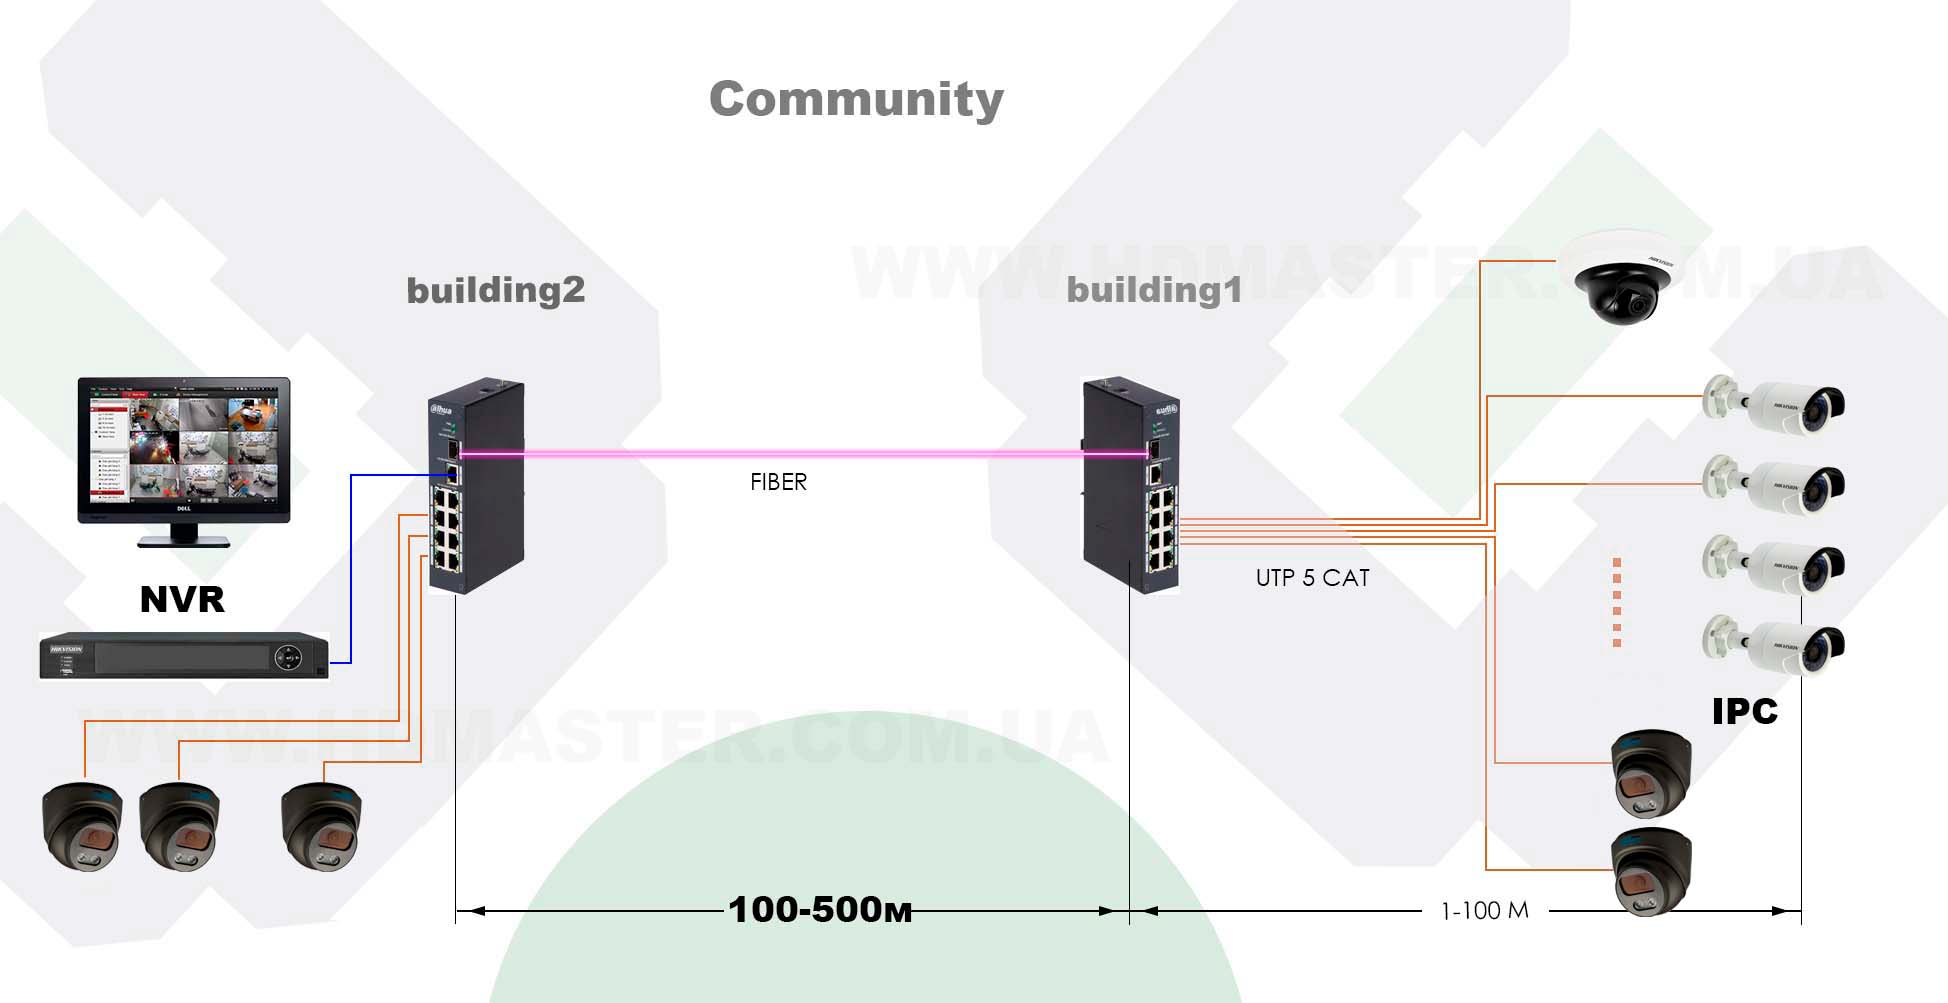
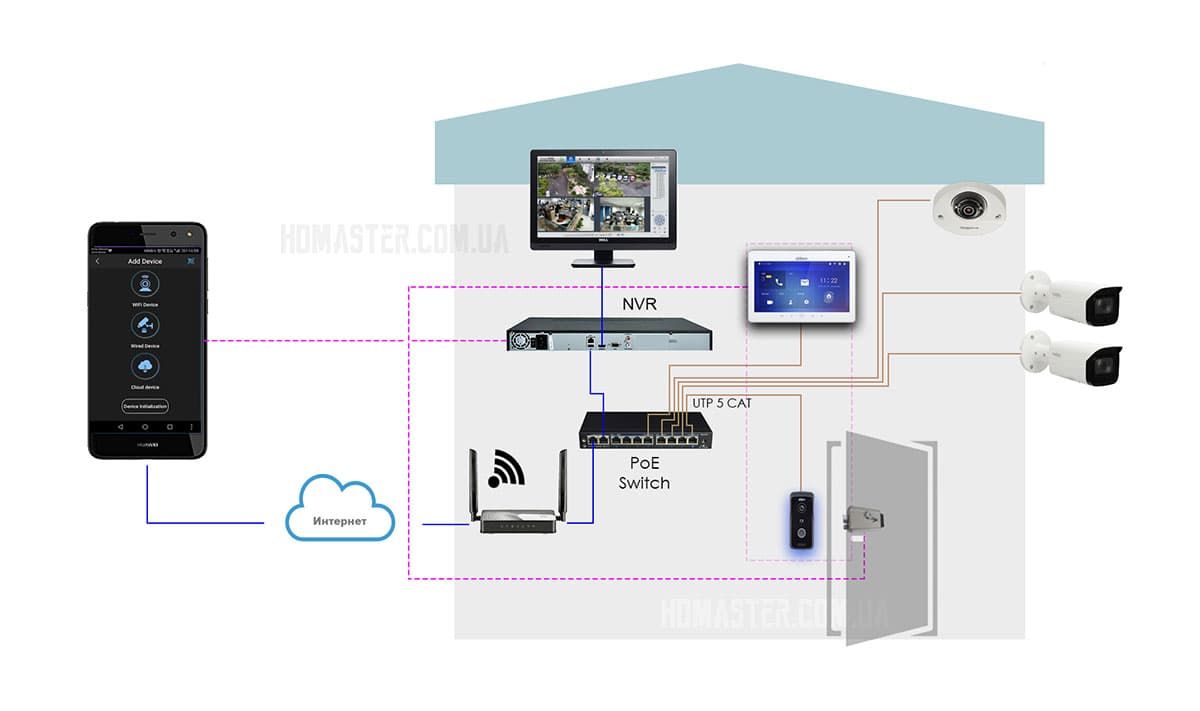
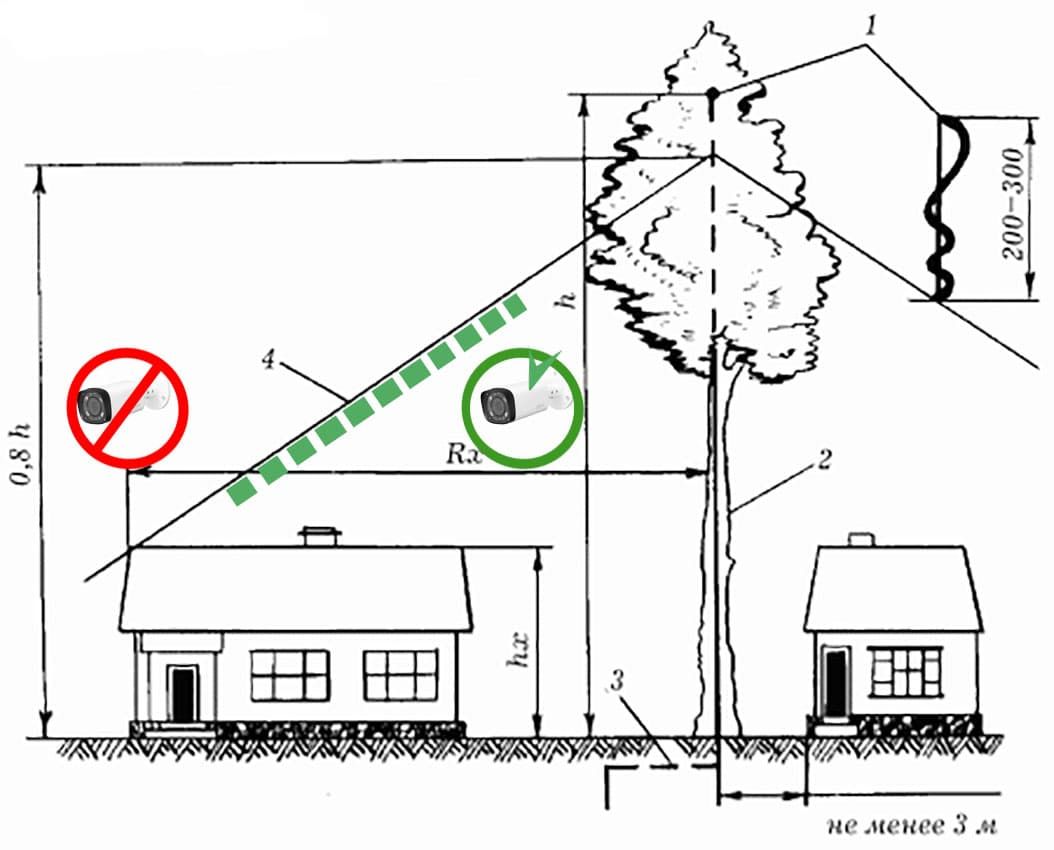
This article outlines a number of recommendations for those who decide to independently install a video surveillance system 

Step 1. Introduction to modern video surveillance formats

Modern high-definition video surveillance cameras are divided into digital  IP cameras  and analogue (HDCVI, HD-TVI and AHD).

If we choose IP, we will get a clean digital image with a resolution of up to 4K without interference and enhanced functionality and scalability. 

IP video surveillance scheme

Fig.1 Example of an 8-channel digital IP video surveillance system with PoE power. IP cameras are connected directly to the IP DVR ports.

IP video surveillance via optics

Fig. 2 Example of an IP video surveillance system in an enterprise using fiber optics

Important!  If the video camera is located at a distance  of several hundred meters to several tens of kilometers from the observation post, it is difficult to find a better solution than IP. When transmitting a video signal in a digital stream, there is no interference or any other distortion similar to those that occur when transmitting an analog signal over long distances.

All this makes IP an excellent choice for those who want to install a system whose technical performance and functionality will meet high requirements for many years to come.

Fig.3 OSBB video surveillance system (a ready-made fiber optic patch cord is used for communication between buildings)

What do video cameras see at different viewing angles?

Currently, technologies allow achieving a resolution of CCTV cameras equal to 4K, which corresponds to frame sizes of  3840 x 2160  pixels and higher (Ultra HD).

In addition to high resolution, modern digital IP video surveillance systems have powerful functionality that allows them to solve any complex problems.

Main advantages of IP systems:

> No signal distortion during transmission;

> Unlimited transmission distance of video and audio streams;

> Resolution - up to 4K and more;

> Ability to transmit multiple video streams simultaneously to many users;

> Ability to integrate IP cameras and IP video recorders into existing local networks (LAN);

> A large number of settings and functions available through the WEB interface;

> Possibility of recording video information continuously and based on movement in the frame to the internal memory card of the camera;

> Most IP cameras have a built-in PoE module, which allows you to receive power via a UTP cable along with data. In this case, PoE switches are used to switch video streams.

> A clear scheme for combining digital video surveillance and intercom systems

Fig.4 Easily combine IP video surveillance and video intercom

Pros and cons of analog (HDCVI, HD-TVI, AHD) systems

If you choose an analog system, you get decent video quality with a resolution of up to 4K for  a lower price , but remember that the wrong video cable and connectors can significantly spoil the quality of the video signal, and an insufficient cross-section of the power cable will add to the overall picture with black stripes running across the image, or loss of video signal when turning on the IR illumination at night.

Connection diagram for video cameras via UTP cable

Fig.5 Example of a 4-channel analogue video surveillance system using a UTP cable.

In general, with the right approach, installing an analog system takes more time than a digital one. The exception is analog kits with ready-made video + power cables of a fixed length (18.5 m). Their advantage is ease of connection. Disadvantages are the difficulty of pulling a cable with pre-installed connectors through a hole in the wall, limited length and low strength of a thin cable.

Comparative video of digital (IP) and analogue (HDCVI) video cameras of the same class (set the maximum resolution in the youtube settings)

Regardless of what type of system you have to install (digital or analogue), the first thing you need to determine is the required number of cameras and their layout. 

Step 2. Selecting a camera layout, resolution and viewing angle

It would seem logical to give preference to cameras with a wide viewing angle of 80 - 90º horizontally in order to cover a larger observation sector. However, this approach also has its downsides.

Trying to obtain a larger observation sector using one stationary camera, we proportionally reduce the size of objects in the frame and, as a result, the number of pixels per given object. 

Wide Angle Surveillance Camera

Fig.6 Example of a picture from a wide-angle CCTV camera (89 degrees).

The use of wide-angle cameras is acceptable and justified in most cases for video surveillance of small private areas, cafes, shops and other objects where it is important to obtain a wide view. 

Cameras with 6, 8, 12 mm lenses are used for video surveillance of ticket offices, parking entrances and other places where it is important to get a close-up view with high resolution. 

Resolution camera with Tele lens

Fig. 7 Example of a picture from a narrow-angle CCTV camera (33 degrees).

Positioning of video cameras to minimize “dead spots”

Let's consider two options for installing outdoor CCTV cameras in a small system for a private home. The video will be useful to those customers who have already purchased  a set of cameras and a recorder  in the Hd-master online store, as well as to those who are still planning to order video surveillance and are at the design or cable laying stage.

It shows how to simultaneously reduce the number of video cameras and “dead spots” by choosing an effective layout.

Reducing the number of video cameras will help us save significantly on the DVR. If you have a limited budget, you will be able to get by with a 4-channel recorder.


Step 3. Estimating the distance from the cameras to the recorder

In a digital system, when using an NVR with a built-in PoE switch, the maximum distance from the NVR to IP cameras is 100m. In the case of using separate PoE switches with CCTV mode – up to 250m. 

Distances greater than 250m require moving the PoE switch closer to the camera, or using optical fiber.  

For high-resolution analog systems, in the case of long cables (60-300 m), experience shows the superiority of thick coax (6 mm) in combination with compression BNC over twisted pair (UTP) with widespread passive transceivers (baluns).

The use of active transceivers improves the quality of signal transmission via UTP over long distances, but the total costs of such a system are close to the costs of a digital system of this class.

Step 4. Select the appropriate format based on the layout and number of cameras

After determining the layout and number of video cameras, taking into account the requirements for cable lines, you can estimate the system budget and select the appropriate format.

Digital (IP) cameras are more expensive than analog cameras, however, the analog system is very demanding on the quality of cables.

Therefore, at distances from cameras to the recorder of more than 300m, the difference in the cost of digital and analogue systems is erased, due to the high costs of high-quality analogue cable.

In addition, 8 and 16-channel analog video recorders (of the same level as them) are much more expensive than digital ones.

It is generally accepted that for compact, inexpensive cottage video surveillance systems consisting of 4 outdoor video cameras, the best choice is an analog HDCVI or HD-TVI system. If the goal is to achieve maximum quality, then digital (IP) systems should be used.

In extended enterprise systems, where the distance from the cameras to the recorder is measured in hundreds of meters, the best choice is a digital IP system.

IP systems are favored by their ability to scale (expand) without replacing basic elements, unlike an analog system.

Power calculation for a 12 volt system

> Use only stabilized power supplies;

> Install power supplies for your system with at least a double reserve of the maximum power supplied to the load;

> Consider the fact that at night, with the IR illumination turned on, the video surveillance camera consumes much more current than during the day when it is turned off. Select the cross-section of the power cable so that the voltage at the camera power input falls within the permissible deviation when powered by DC12V, or use a DC24V power supply with subsequent reduction and stabilization to DC12V on the camera side using an additional stabilizer.


Simple calculation of cable voltage drop

Initial data:

Let's assume that the distance from the 12V power source to the video camera is 50 m. The cameras are connected via a UTP cable according to the diagram in Fig. 2.

Power consumption of the camera: 6W

Cable used: UTP 4x2x0.5 with copper conductors. The linear resistance of one conductor is Rpog = 11 Ohms per 100m. or 0.11 Ohm at 1m.

Calculation:

Current consumed by the camera – I cam=P/U = 6/12 = 0.5A

We use a parallel connection of conductors according to the diagram in Fig. 2.

Resistance of the “positive” conductor (white/or + orange) 50m long – (Rpog*L)/N (where N = 2 wires) = (0.11*50) / 2 = 2.75 Ohm.

Resistance of the “negative” conductor (white/blue + blue + white/brown + brown) 50 m long – (Rpog*L)/N (where N = 4-wire) = (0.11*50) / 4 = 1.38 Ohm.

Total resistance Rpad total = 2.75 + 1.38 = 4.13 Ohm.

The voltage drop on a given 50 meter power cable is Upad = I kam * Rpad total = 0.5 * 4.13 = 2.07 V.

This voltage drop will occur at night when the IR illumination is turned on. During the day, the camera consumes about 5 times less, so the drop will be 2.07/5 = 0.42 V.

If the camera specifies a +25% tolerance on the supply voltage, then at 12V it is +3V. Thus, it can be seen that using a parallel connection of conductors, we did not go beyond the tolerance limits for a given cable length and for a given camera, and we can use an unregulated stabilized 12 V power supply installed next to the recorder.


What to do when such an analog camera is 100 m or more away?

Output 1 - Use a larger power cable

Output 2 – Use the same cable, but a 24-volt power supply with the installation of an additional 24-12V converter on the camera side

Output 3 – Use equipment with PoC technology (power and signal over coaxial cable)

- By installing the power supply directly next to the video camera, you solve the problem of voltage drop and interference induced in the power supply circuit.

- When installing a single power supply for cameras and the recorder, keep in mind that the DVR and its HDD are the main sources of interference for the cameras along the power supply circuits. Use additional filters.

Calculation of an autonomous power source for a 12-volt system

The capacity of the battery that ensures uninterrupted operation of the system is calculated based on the power of the system and battery life. It is undesirable to allow a “deep” discharge of the battery, since in this case its service life (the number of charge/discharge cycles) is significantly reduced. 

Let's assume that the total power of our system is 50 W. Let's calculate what capacity the battery is needed so that if the 220V network is lost, the system functions for 2 hours until 50% of the battery capacity is lost.

The amount of energy required by a 50 W system for 2 hours is Q=50*2 = 100 Wh.

Required battery capacity E=Q/(Vx*k), (where Vx is the battery voltage, k is the discharge coefficient).

E=Q/(Vx*k)=100Wh/12v*0.5 = 16.7 Ah. Thus, a battery with a capacity of 17 Ah is suitable for this task.


Step 5. Connecting video cameras to the DVR “on the table”

Connecting and testing the system at home always saves time and nerves. All possible errors in choosing equipment and matching devices with each other are identified at the initial stage. At the same time, the appearance and the possibility of returning equipment that, for some reason, did not suit you, are preserved.

If you are installing an HDCVI, HD-TVI, AHD camera or IP camera with 12V power supply:

Before applying power  to the cameras, use a multimeter to check the magnitude and polarity of the voltage directly at the power connector connected to the camera. Incorrect polarity may damage the camera. The supply voltage must be within the limits specified in the camera specification (You can find this camera model on our website and check the permissible voltage in the characteristics table or by downloading the PDF specification);

After turning on the power, check the voltage value at the camera connector under load with and without IR illumination. To turn on the IR illumination, cover the front glass of the camera with your palm so that the light sensor switches the camera to night mode. Check the voltage drop  across your cable length  when the IR illumination is turned on. In this case, the voltage at the camera connector must be within the range of operating values ​​specified in the camera specification, both with and without the backlight on.

An excessive value may damage the camera. An underestimated value may not be sufficient to run the camera (You can find this camera model on our website and check the permissible voltage in the characteristics table or by downloading the PDF specification).

Connecting HDCVI, HD-TVI, AHD cameras to the DVR usually does not raise any questions, so we will focus on adding IP cameras to the DVR using Dahua and Hikvision as examples.

Connection, detection of Dahua IP cameras on the network, adding IP cameras to the DVR. ConfigTool utility. IMOU application.

ConfigTool V3.20.0 utility (Download 16.4 Mb)

Several ways to activate the Hikvision IP camera. Adding an IP camera to the recorder through the recorder's on-screen interface. SADP utility.

Step 6. Installing CCTV cameras

If everything works, it’s time to move the cameras to their installation locations and connect them to pre-installed cables.

The video surveillance system is part of the security system, so special attention must be paid to the reliable installation of cameras and the maximum inaccessibility of connecting connectors and cables to intentional damage.

The designs of modern camera brackets and mounting boxes allow installation without sagging cables - all connections are securely hidden inside the metal junction box. In addition, such boxes with a dust and moisture protection rating of IP66 protect connections from moisture.

Water getting into the network connector is one of the most common causes of failure of an outdoor IP camera.

Mounting boxes and brackets for CCTV cameras

Fig. 8 Various options for installing Dahua IP cameras using mounting accessories.

Lightning protection

Install outdoor video surveillance cameras in the coverage area of ​​natural or artificial lightning rods. In other words, don't try to place your camera at the highest point - this will make it more likely to get damaged during a thunderstorm.

The correct choice of installation point “works” better than additional lightning arresters. It is also important to avoid contact between the camera body and metal structures. If installed on a metal support, use dielectric gaskets (if this does not contradict the safety regulations and PUE).

Lightning protection for CCTV cameras

Fig.9 Installation of the camera within the lightning protection zone.

1 – lightning rod, 2 – down conductor, 3 – grounding conductor, 4 – border of the lightning rod protection zone, Rx – protection radius at height hx

Grounding

The body of the DVR or switch on the receiving side must be grounded to the building ground loop for low-current systems, if any. 

The metal parts of the connectors on the side of the video camera and the body of the cameras to which 12V or PoE 802.at/af voltage is supplied should not be grounded, except in cases where there is a danger of life-threatening voltages above 48 volts appearing on the conductive elements of the camera structure or connectors as a result of an accident. . In other words, when grounding the metal body of the camera, first of all it is necessary to be guided by the requirement of electrical safety.

When installing video cameras with a coaxial video output on a metal support, if the metal body of the camera is connected to a common conductor, it is necessary to use dielectric spacers (if this does not contradict the safety rules and electrical regulations). Otherwise, grounding devices at two opposite points of the line will cause interference currents to flow through the cable braids and modulation of the useful signal by interference.

If the camera body is grounded, pay special attention to ensure that the camera is within the range of the lightning rod, otherwise it is likely to be damaged during a thunderstorm.

Avoid installing video cameras in the area of ​​electrical installations. In case of installation in the area of ​​electrical installations. First of all, follow the safety rules and PUE.

Combating counter lighting

The low-lying sun in the morning and evening entering the field of view will blind any camera, regardless of price. Take this into account when choosing the installation point and avoid direct sunlight entering the camera lens. To a lesser extent this applies to lighting lamps.


Video surveillance for home || video surveillance for apartment || installation of CCTV cameras in Tashkent || Installation of CCTV cameras in Tashkent with a guarantee || Video surveillance in Tashkent || Installation and maintenance of CCTV cameras || Installation of video surveillance cameras HIKVISION || Installation of CCTV cameras in Tashkent || installation of CCTV systems and cameras in Tashkent

We will be glad to cooperate with you

Contacts

Tashkent city, Shaykhantakhur district, Kukcha Darvoza street, 10